HOWTO Install EZ-RJ45 Plugs
Anyone who has installed RJ45 plugs on the ends of cable knows that a good reliable connection it takes time,
and practice. Thats why EZ-RJ45 connectors are worth the extra money that you pay for the connectors. Installing EZ-RJ45
plugs is one of the easiest, and most reliable methods for installing RJ11/RJ12, RJ45 connectors.
- Remove about 2" of cable jacket.
- Carefully untwist, and straighten exposed wire.
- Insert the wires into the plug till the jacket is inside the connector.
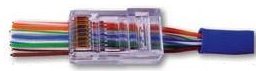
- Compare with chart below to verify the wires are in the proper location.
|
|
| Wire |
1 |
2 |
3 |
4 |
5 |
6 |
7 |
8 |
| T568A |
W/G |
G |
W/O |
BL |
W/BL |
O |
W/BR |
BR |
T568B |
W/O |
O |
W/G |
BL |
W/BL |
G |
W/BR |
BR |
|
- Pull the wires so that the outer jacket of the cable is firmly seated into connector. You will achive better performace if
you can maintain the twists of the wires as close as possible to the contacts.
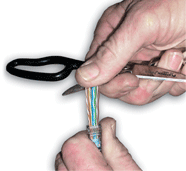
- Put cable, and connector from step 3 into the crimp tool's RJ45 port, and squeeze the handle together.

- Trim off any excess wires, and remove plug from the crimping tool.
- Remove the EZRJ45 plug from the crimp tool.
- Start from step 1 with another wire, and plug. This one is done!
